2021年10月5日星期二

MB SD Connect C5 Star Xentry Diagnosis Hardware, Software, Guide, Install, Upgrade


MB SD Connect C5 Star Xentry Diagnosis Hardware, Software, Guide, Install, Upgrade

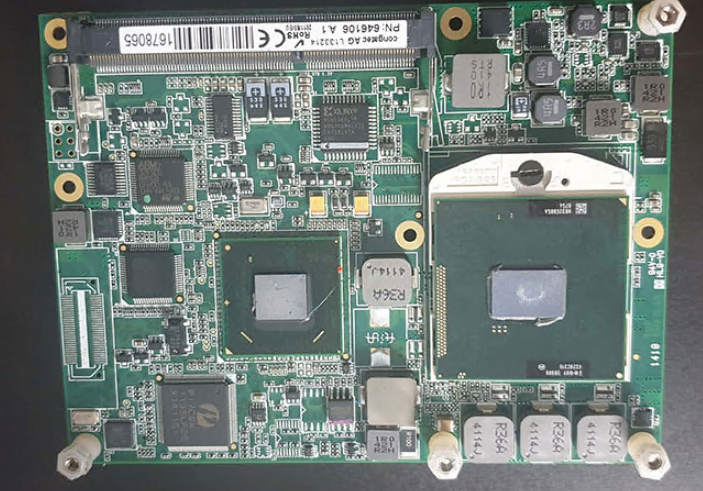
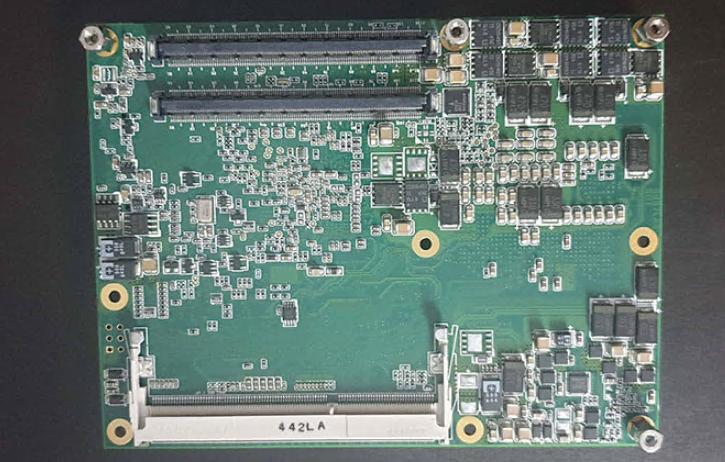
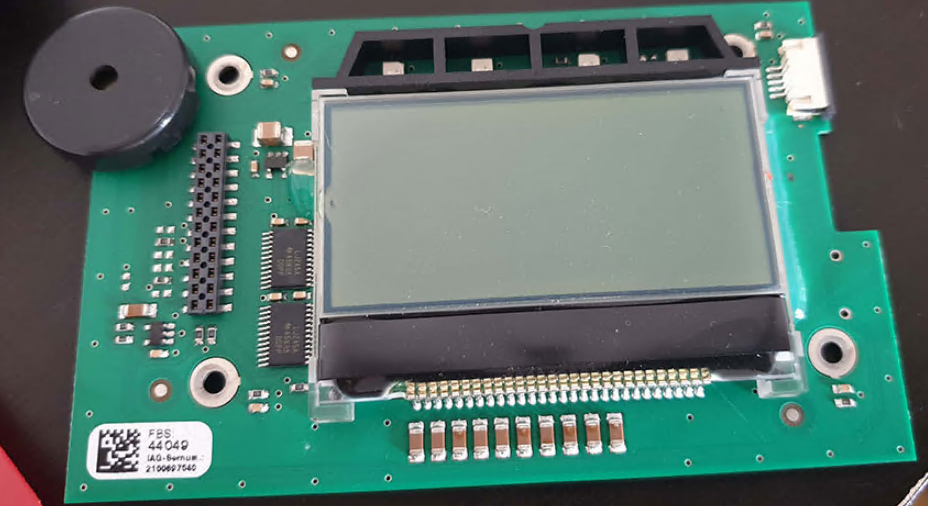
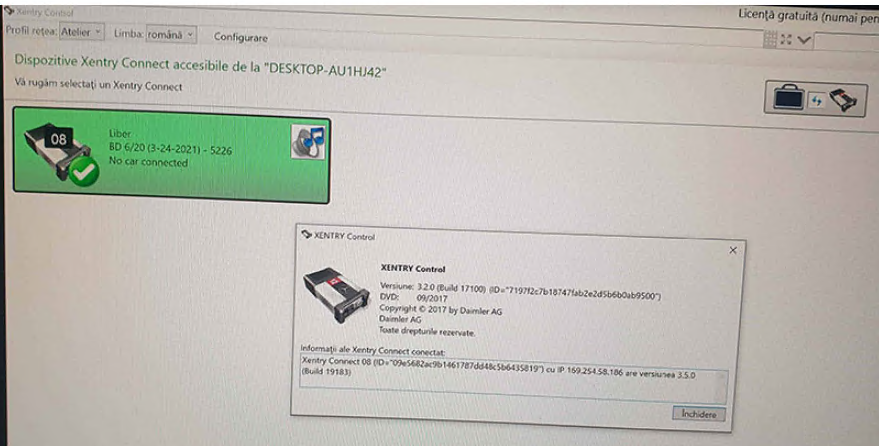
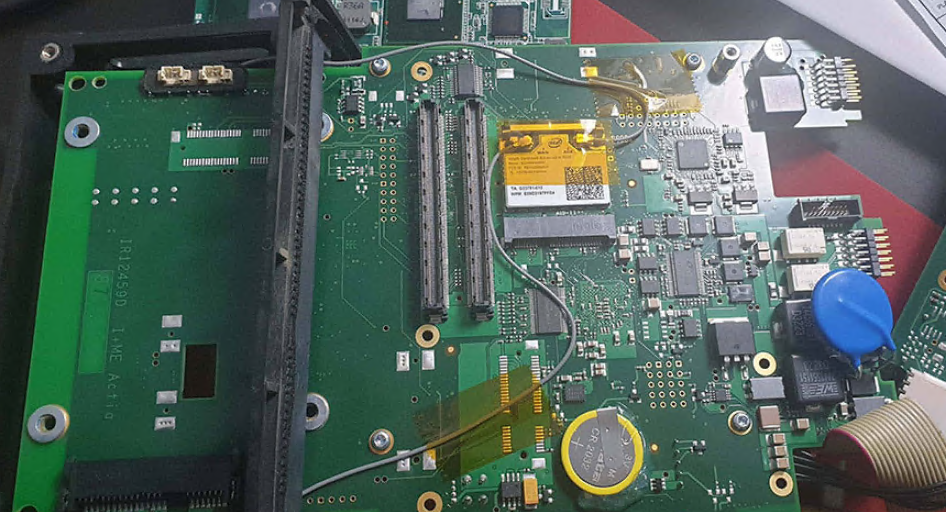
Well, after buying lots of Xentry Connect and working with them, I realized, man they are slow as shit, from booting up the interface, to appearing in xentry control, to opening up xentry, lots of time, this is because it is not like china clones, or SDConnect (C4), or VCI (C6) which are normal interfaces not a whole computer like Connect, so I managed to completely disassemble the interface and see if it is possible to do something about it.

So, this interface or minicomputer has the following:
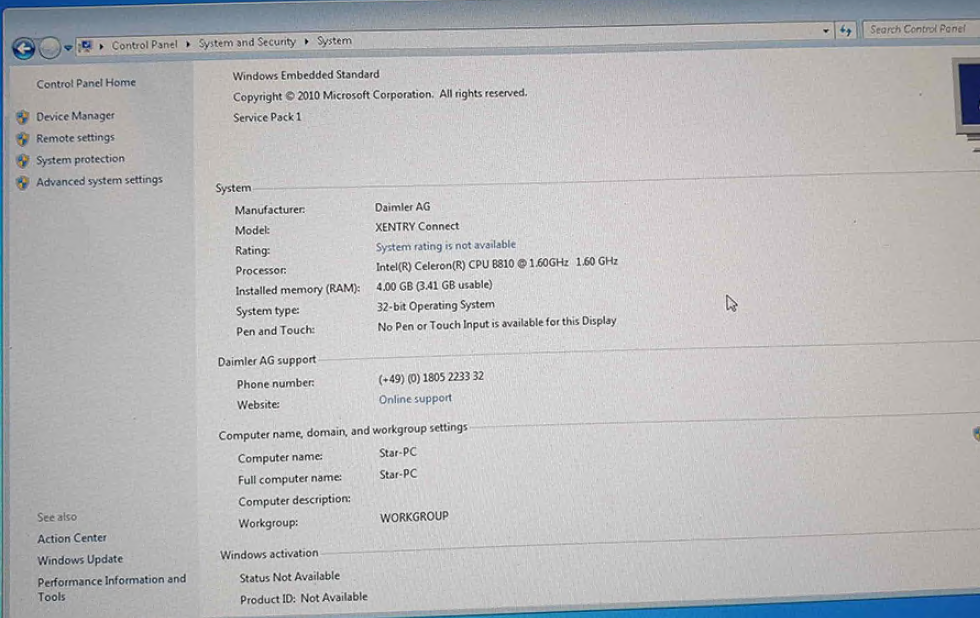
OS: Windows 7 32bit Embedded
MB: HM65 Chipset
CPU: Intel Celeron B810 2 cores 2 threads 1,6Ghz 35w, 2mb L3 cache, PGA989 (2nd gen) this is the biggest issue, cheap shit processor
GPU: Integrated obviously
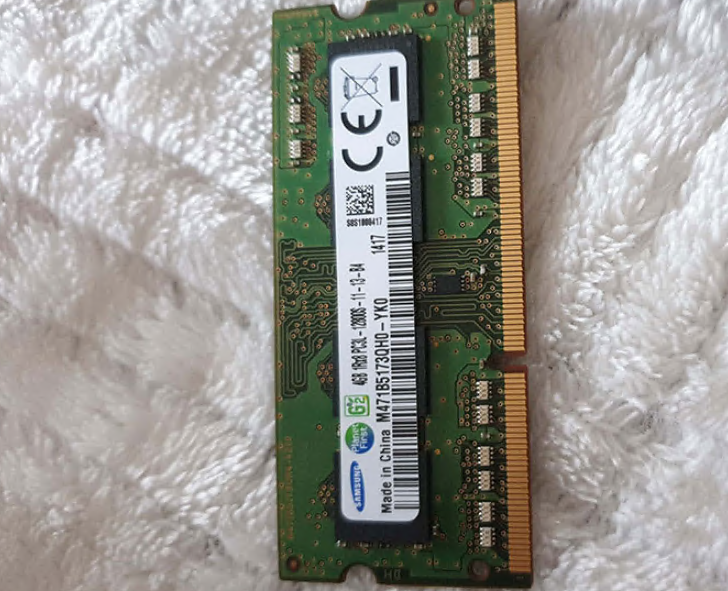
RAM: 4Gb Samsung DDR3 1333Mhz, can’t put 8gb because windows is 32bit so limited to 3,5Gb
SSD: Xmore quality 256GB
WiFi: Intel Centrino Advanced-N 6205 2,4Ghz and 5Ghz 300mbps PCIe Half MiniCard not wow but decent

it has a USB dongle into the board, it is 4Gb, no idea what this is

This device is in testing/development at least since 14/07/2011, first versions appeared in at least 2012

I encountered 2 versions of this ssd, 1 with 238GB found on XC older than 2014, 1 with 223GB found on XC newer than 2015

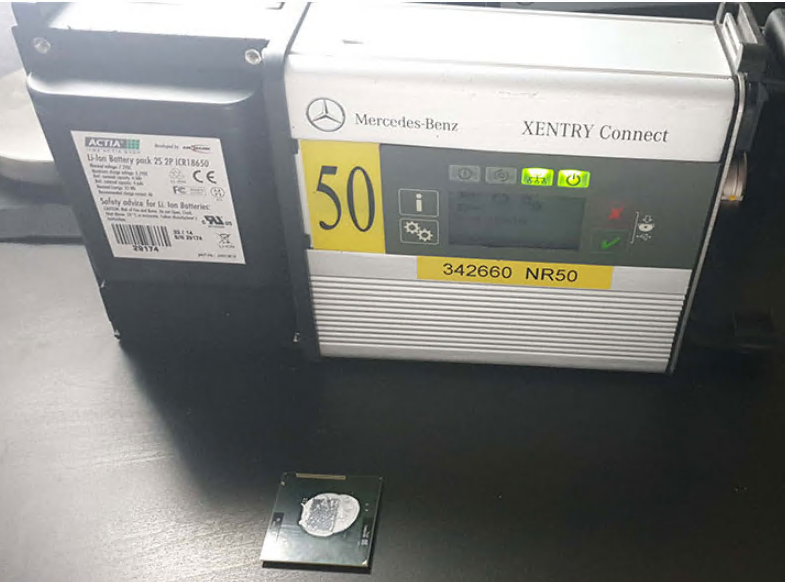
Upgrade: change that celeron cpu to something better, I personally changed it to i7 2640m 2 cores 4 threads 2,8Ghz 3,5Ghz 4Mb cache 35w

From starting xentry program until Data status 2020/06 appeared

Celeron: 57 Seconds
I7 2640m: 25 Seconds

From Sleep mode to No car connected

Celeron: 47 Seconds
I7 2640m: 37 Seconds

MUCH FASTER in Xentry program!!!
The reason why I choose the i7 2640m is because it is the most powerful 2nd gen processor of 35W (VERY IMPORTANT), more watts mean more heat, and the interface only has 1 small radiator and 2 small ventilators (like a laptop), i wouldn’t risk for right now putting a better processor as i’m afraid it will not cool as it should, it will overheat

Tried a 2670qm (4 cores 8 threads) and the interface shuts down, not temperature problem but watt consumption problem, motherboard can’t deliver enough power and shuts down even ventilators completely, so maximum i recommend 2 cores 4 threads

Also, it is possible to install 3rd gen processors but motherboard doesn’t support 3rd gen processors even doe it is the same socket PGA-989

Check attachment regarding Compatible processors for 2nd gen

INSTALL:
1. Take out battery
2. Take out shield from Backside of Xentry Connect, it has double side addesive
3. Unscrew the 6 screws from radiator
4. Take out radiator
5. Turn the small black protection
6. Change cpu with NEW thermal paste
7. Put all back and that’s it

SSD: You could try putting a better ssd, space is enough actually more than needed for only Xentry, it’s ok for Vediamo, WIS/EPC, Monaco etc.
Couldn’t find any data or performance stats for this ssd, never heard about this company, you can clone this ssd with another one and try

Ram: 4Gbs is max for 32bit, even more, no reason to put more than 4Gb ram, only if you somehow manage to install windows 7 embedded on 64bit

WiFi: Looked for the Intel AC-7260 but it is said it is buggy as hell, also you need to change drivers for the wifi card, which is kinda complicated, you can install driver booster on the interface’s windows (through remote desktop connection) and install driver from the wifi card you install

It supports USB 2.0, 3.0 and 3.1

SOFTWARE:
1.1 Xentry Tab (Part of Xentry Kit 2)
This is the software that you will have on your laptop

1.2 Options:
1)Download separately Xentry Tab from attachment you have there Setup, open and install
2)Skip to 2.1 and install from Xentry Kit 2 folder, you have there Setup, open and install

2.1 Xentry Connect (Part of Xentry Kit 2)
I highly recommend to update interface to latest Xentry, which is 2020.06 also there will not be a newer Xentry for this interface, need to buy kit 3 or 4
1. Link is in the attachment, download KIT2 06-2020 Final Edition
2. Extract with 7zip and copy the folder and put it on a minimum 32Gb USB Stick or External SSD/HDD

3. Installing the release update on the XENTRY Connect
Please note: The XENTRY Connect must be in standby mode to install the release update. You can shut down the XENTRY
Connect directly on the device via the menu (gearwheels button) or from the XENTRY Control session.

4. Connect the power supply unit to the XENTRY Connect and insert the USB data storage medium into a free USB port of the XENTRY Connect.

5. Now start the update mode of the XENTRY Connect by simultaneously pressing the two “red cross” and “green tick”buttons.

6. Once “Start update” appears on the display, confirm this with the green tick. The update procedure starts. This will be indicated as follows on the XENTRY Connect display:

The USB update takes about 100 minutes. The XENTRY Connect indicates when the update is finished on the display.

7. You can complete the process by pressing the “gearwheels” button. Or, wait until the XENTRY Connect automatically shuts down (approx. 10 minutes after the picture appears on the display).

2.2 Configuration from Xentry Control
1. Start the interface
2. Connect LAN cable to interface and laptop
3. Open Xentry Control and in the top section open configuration
4. Go step by step with lan and wifi and others bla bla

2.3 Xentry License/StartKey
In case your Xentry Connect has expired license, 99% chance because dealership started to use kit 3 from 2018/06, can check by opening StartKey Center or Xentry (No Acces authorization code), then you need to activate license
For this, i’m not publishing for free solution, contact me if needed, activation is 100 Euros

Problems/Issues/Errors:
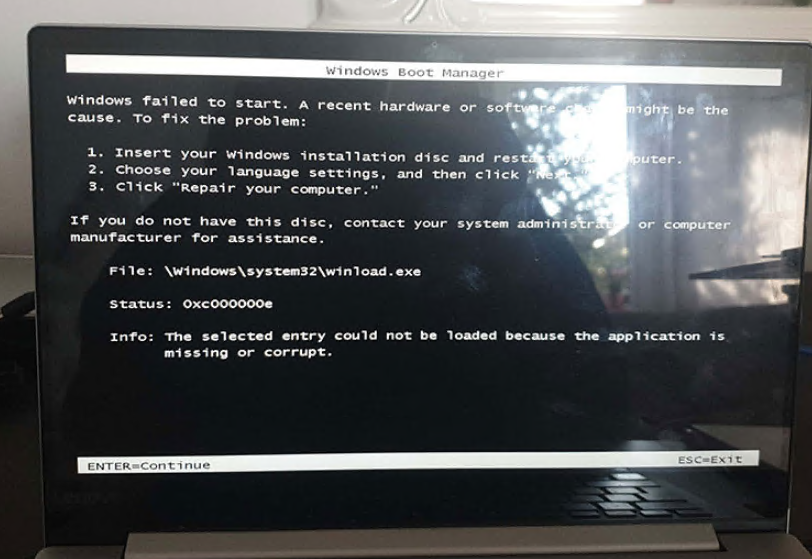
In case you have Device is booting/Update (when not updating) for looong time, more than 3 minutes

1. Make NORMAL not embedded Windows 7 32bit NOT 64bit USB bootable drive, minimum 4Gbs

In case you have new laptop with USB 3.0 and you have no mouse in Windows 7 install setup, you need to integrate USB 3.0 Drivers into Windows 7 ISO with NTLite, check youtube

2. Take out SSD from Xentry Connect
3. Connect to laptop, or if you have older laptop install in laptop
4. Connect USB Stick with Windows Embedded 7 32bit
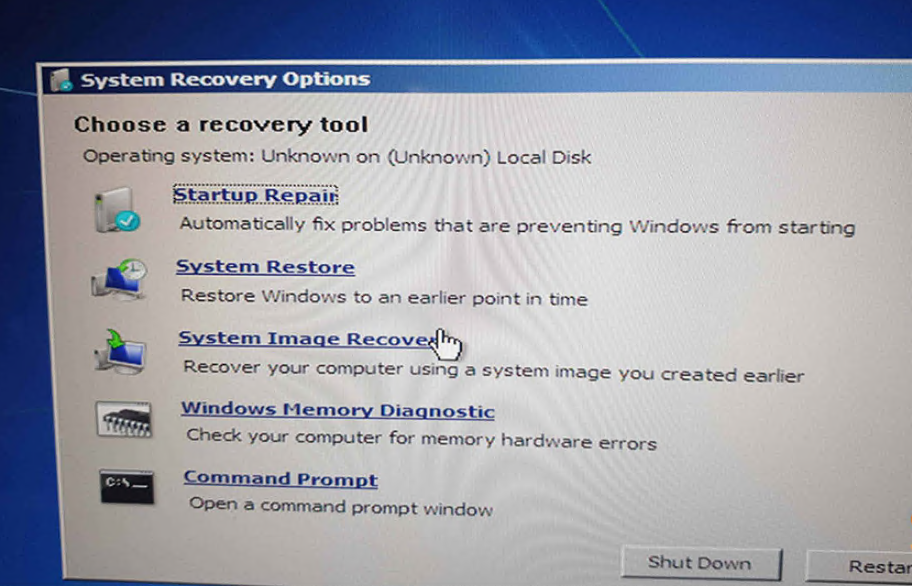
5. Select Language, Repair my computer
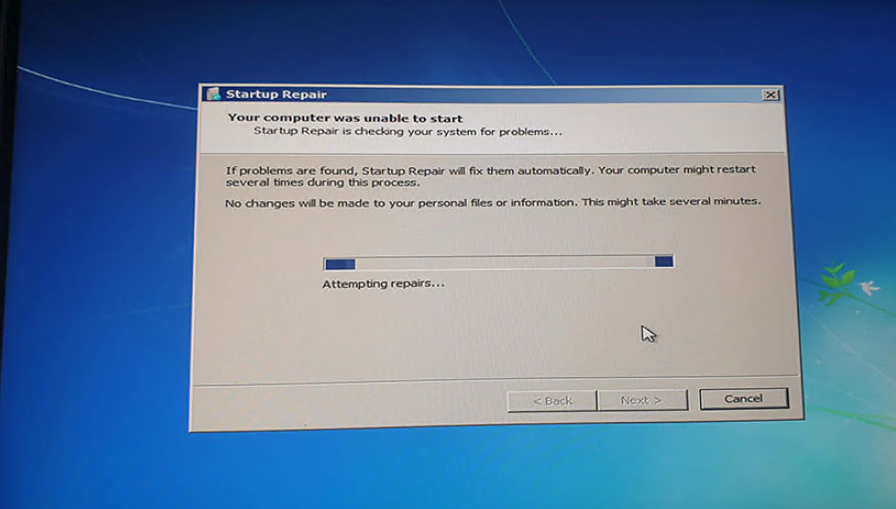
6. Select Startup Repair, let it do it’s thing
7. Insert SSD back to Xentry Connect and done

VERY IMPORTANT, PUT AT LEAST 1 SCREW to hold SSD to not move, if it moves you will corrupt BCD again (not booting, update/device is booting for long time, jump to 2)

If you have update error, doesn’t matter what error:
1. Open Support Tool
2. Go to Reset
3. Check I have spoken to the Diagnosis UHD and would like to reset the Xentry Connect
4. Click Setting up USB data media
5. Select USB stick (file that will be on USB stick is 1.6KB so insanely small)
6. Insert USB stick into XC
7. Press Tick (Green) and X (Red) at the same time (while in Sleep mode)
8. Let it to it’s Reset (x/15)
9. Perform Update with 2020/06

Only the display is lighting up but no text can be from multiple causes, internal defect, missing hardware display files, bios chip fucked etc.

If you don’t want to change cpu which would be a stupid decision, at least take off the back cover, A LOT of dust accumulated over the years can be there and it is blocking cooling very badly (see picture attached)

OPTIONALLY

DAS Standalone
Vediamo 05.01.01
WIS 2020.04 (after 2020.04 xentry connect no longer supported), i tried copying missing files from 2020.04 to 2020.10 but it doesn’t work and it’s not that simple)
DTS Monaco 8.16


2021年9月30日星期四

How to Update the wiADVISOR microPod

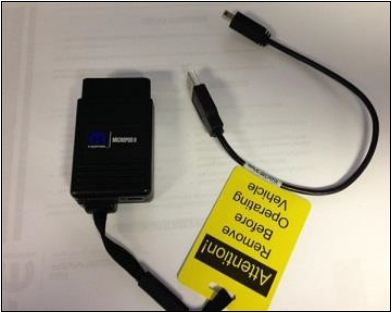
In order to ensure the wiTech MicroPod 2 is working properly, it will be necessary to update it based on the latest software releases provided by Chrysler. If your microPod is at version 0.4.2, it will not communicate with wiADVISOR. You must perform  an update to version  1.2.2  using  the USB cable that came with the microPod (see below).

How-to-Update-the-wiADVISOR-microPod-1

To update your microPod using the USB cable:

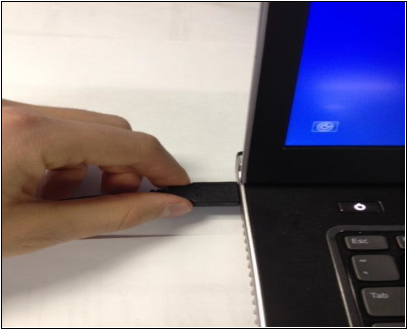
1.Connect the large end of the USB cable to a computer that has the wiTECH Diagnostic Application already installed – Typically this is a computer in the shop.

How-to-Update-the-wiADVISOR-microPod-2

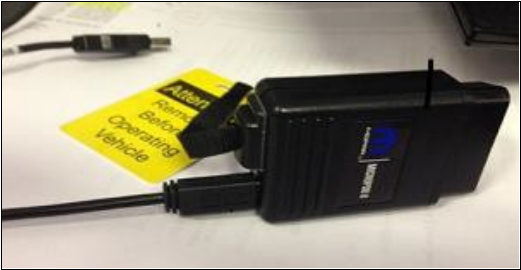
2.Connect the small end of the USB cable to the microPod as shown below:

How-to-Update-the-wiADVISOR-microPod-3

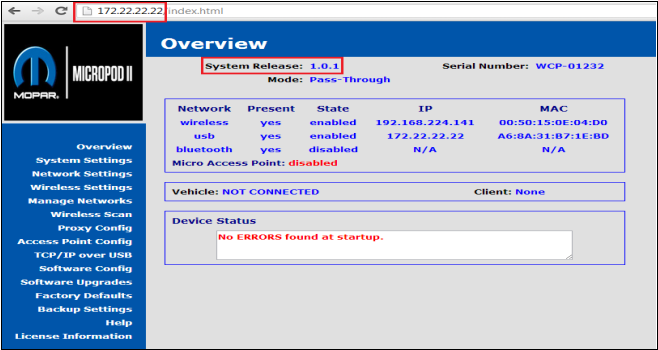
3.Once the microPod is connected via USB, a green light will come on. Open your Internet browser and type the IP address 172.22.22.22 in the address bar at the top of your browser and hit Enter on your keyboard. The microPod interface will come up as shown Below:

How-to-Update-the-wiADVISOR-microPod-4

a.If the System Release shows any version besides 1.2.2 (red box on image above), then your microPod should update to the most current version if the wireless connection on the microPod is properly configured.

-OR-

b.If the System Release version shows 0.4.2, the wireless connection on the microPod must be configured in order for the microPod to update.

Once wireless is configured, simply wait until the light on the Auto Scanner Tool microPod will begin to flash with slow bursts of red indicating that the microPod has started the update process. You will not be able to access the microPod during the update and will have  to wait 4-6 minutes before it finishes. The flashing red light will return to green once the update is complete.
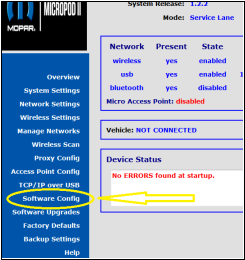
4.NEXT: Click on ‘Software Config’ (left side):

How-to-Update-the-wiADVISOR-microPod-5
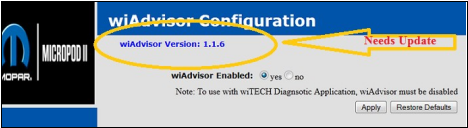
a.If the wiADVISOR version is 1.1.6, this needs an update. See below:

How-to-Update-the-wiADVISOR-microPod-6

b.To update the App Version to 1.1.9, simply leave the microPod plugged into the PC. Pod will update itself. Refresh the screen until the version shows 1.1.9.

5.Now that your microPod System Release shows version 1.2.2, and the software shows an App version of 1.1.9, your microPod is now up-to-date.

Determining the Status of your microPod:

If you are not sure if your microPod requires an update, follow the below steps to confirm  this. To view the current status of your microPod, you must be logged into  the wiADVISOR  application and have selected “Vehicle Queue” in the interface. When a  microPod is  powered up, the software status will be displayed along with connected vehicle information.

1.microPod Status Types – There are three types of update statuses available for the microPod:

a.Up-to-date – This status indicates that your microPod is up-to-date and no  further action is required at this time. If the software is up-to-date, no  status information will be displayed. Otherwise one of the following two scenarios will be shown.

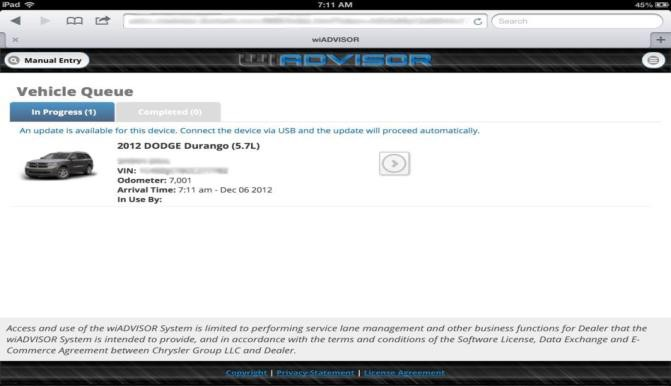
b.Update Available – This status indicates that there is an update  available for your microPod.  It is highly recommended that you update your microPod at your earliest convenience. You may continue to use the microPod without updating it when this status appears.

How-to-Update-the-wiADVISOR-microPod-7

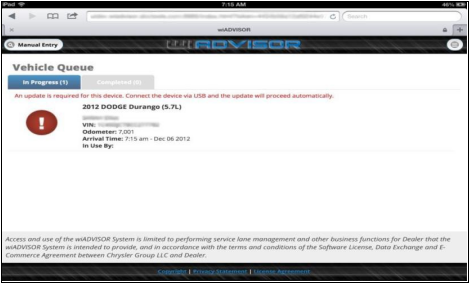
c.Update Required – This status indicates that an update is required on the microPod in order  to continue using it.

How-to-Update-the-wiADVISOR-microPod-8

2.To update the software, disconnect the microPod from the vehicle and connect it to your computer using the USB cable (computer must have the wiTECH Diagnostic Application installed).

3.Since your microPod is updated to the 1.2.2 System Release; once booted and no vehicle power is detected, the microPod will automatically begin the update process. Depending  on what software is being updated, the process can take anywhere from a few seconds to several minutes.  During this  time  the  LED  lights will blink red and off.  Monitor the Vehicle Queue to determine if the update has completed. Disconnecting the USB  cable prior to update completion may leave the microPod in an irrecoverable failure state.

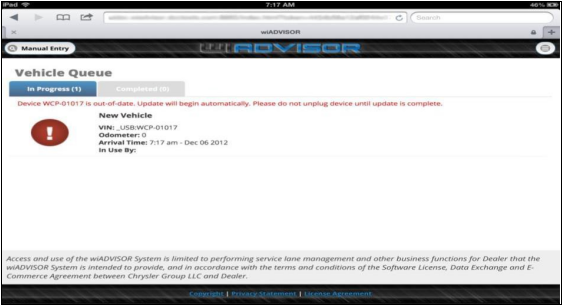
After powering up with the USB cable, the screen will warn you that the update is starting and you must not unplug the device until the update is complete (see below).
How-to-Update-the-wiADVISOR-microPod-9

4.When the update is completed, the text in the Vehicle Queue will change indicating that microPod is up-to-date.  At this time, it is safe to disconnect the USB cable and re-connect   to a vehicle.

Troubleshooting Tips:

If you find that you are having issues with updating your wiADVISOR microPod there are few resolutions you can try.
1.Make sure you have wiTECH installed on the computer. (The microPod needs the wiTECH drivers in order to connect to the PC)
2.Try a different USB to mini USB cable.
3.Unplug the cable from the PC and try a different USB port.
4.Try a different PC; make sure you are in range of the wiADVISOR Access Point.

If you have any questions or concerns, please contact us via email at sales@obd2tool.com.


https://chryslertroublerepair.blogspot.com/2021/08/how-to-update-wiadvisor-micropod.html

VXDIAG Benz C6 2021.6 VCI Multiplexer Failed Solution

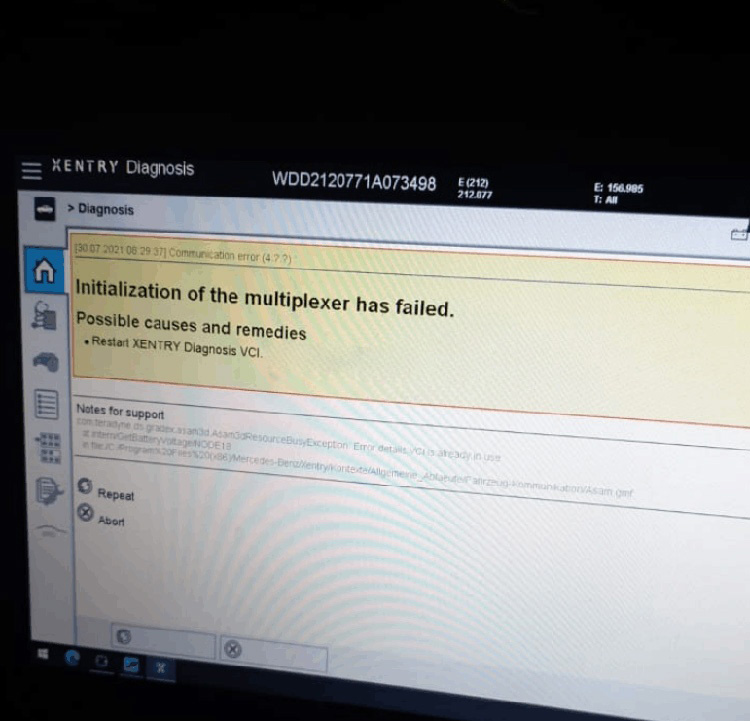
 he problem goes like this:  I just try to read fault codes with Vxdiag Benz C6 new 6-2021 xentry version, but the VCI can’t make connection to car (W212).

Opens normally and start making connection, popup says VCI available But when starting diagnosis don’t connect, comes initialization of multiplexer failed fault info screen. See pic attached

VXDIAG-Benz-C6-2021.6-VCI-Multiplexer-Failed-Solution

VX Manager seems good, and I have update VCI and make reconnecting, nothing don’t help.

Obd2tool.com working solution:

The problem can be solved by installing the new patch.

Download Xentry Patch 2021.06.exe within the VCI client here

https://mega.nz/folder/FYl0RKRL#JHZETHntbTflzNWfFr9NMw

Feedback:

I made that. Now it works. Thank you.

2021年9月15日星期三

Autel IM608 Repeats EIS Prompt for Benz W220 Password Reading


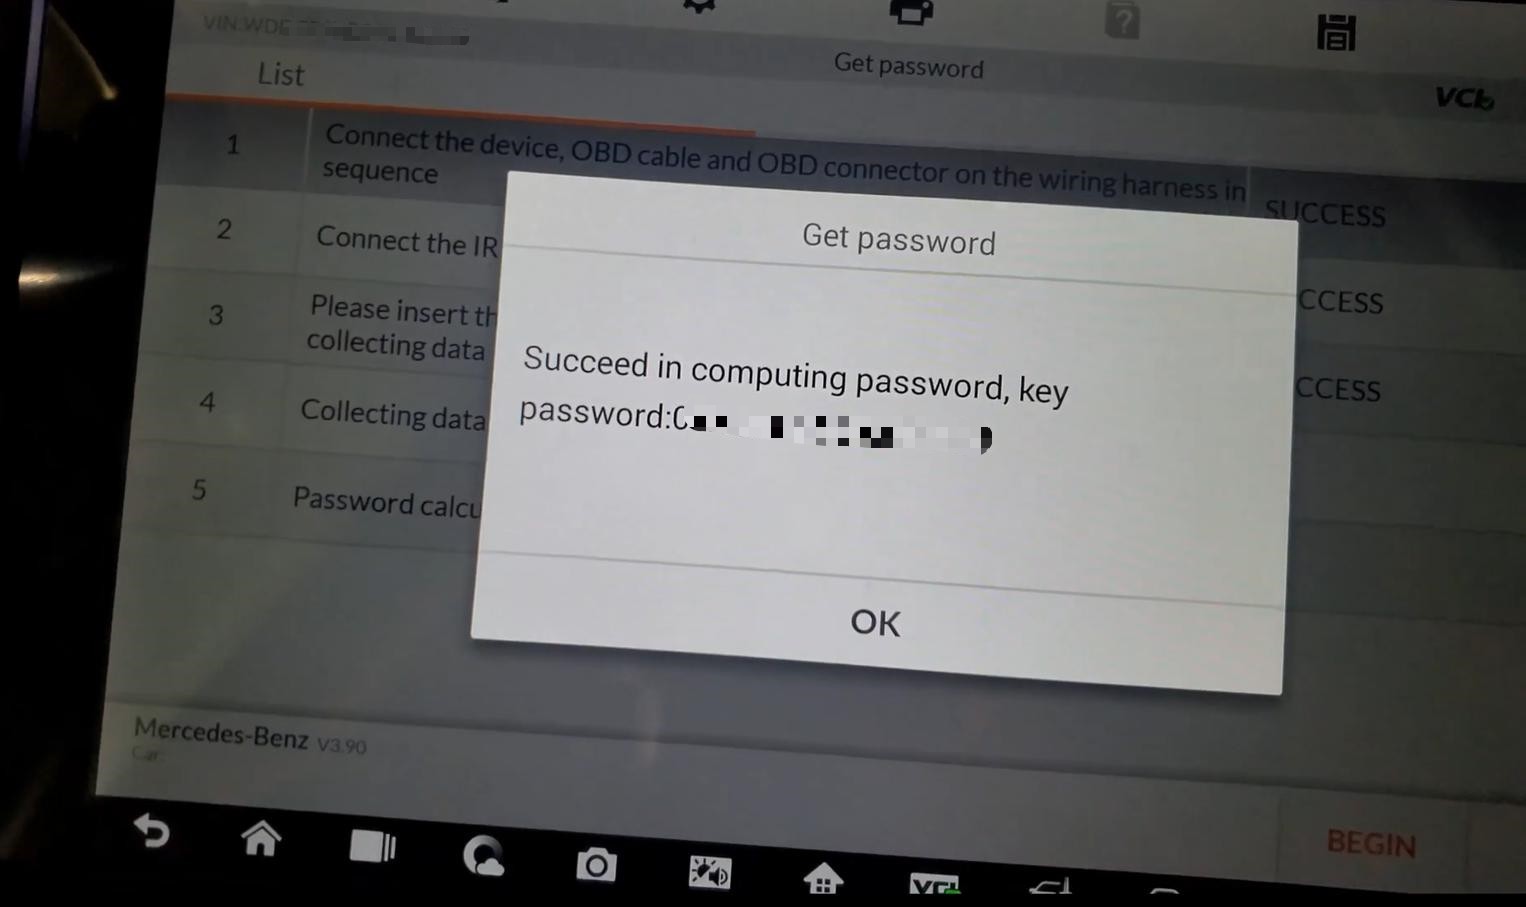
One user gave a feedback that during the password calculation process of Autel MaxiIM IM608 it’s asking him to insert the key into the EIS for 10 seconds. What puzzles him is that the prompt displays almost every minute until the calculation success.
autel-im608-repeats-eis-prompt-for-benz-w220-password-reading-1

He’d done Benz key programming for several times but never had this happen before, and this time the car is Benz W220 2003. After repeating the step for many times, finally he got the password.

Besides, this issue happens on others as well. They said they’ve done this about 12 or 15 times to get the password and it’s normal to work on old Benz models.

Possible reason and solution:

Here our technical support believed that because of the old model the transmission signals of the EIS that turns rusty weakens. So they’d better try more time as the prompt.

In addition, our technical support prompts that there are three modes to calculate the Benz password by Autel MaxiIM IM608: On Vehicle, On bench(G-Box) and On bench. So make sure the connections are correct as the prompts and diagrams of different modes. For instance, On Vehicle mode often requires a bypass; Care the connections when Autel G-Box2 Adapter is needed, etc.

autel-im608-repeats-eis-prompt-for-benz-w220-password-reading-2

Therefore, the prompt “Insert the ignition key into the EIS and wait for 10s” is normal, just follow the prompts and finally it will give you the password.

autel-im608-repeats-eis-prompt-for-benz-w220-password-reading-3

Done!

Porsche EEPROM Programming with Autel IM608 Pro


Autel IM608 Pro is not only an on-vehicle programmer but also an EEPROM programmer. One tablet supports multiple ways to replace car keys, which can efficiently support your repair works. This post will show you that how to use it to program EEPROM on a Porsche.

EEPROM is hard to navigate. There are two scenarios for using EEPROM.

*   One is if you want to add a new key using certain vehicles like BMW, AUDI and Porsche.
*   Another is if you replace an ECU like the engine and need to read the old unit’s info.

It’s easy to program a Porsche key using Autel IM608 Pro and D flash. That means we will read the data from a chip.

Procedures:
First, take out the chipset from the immobilizer system
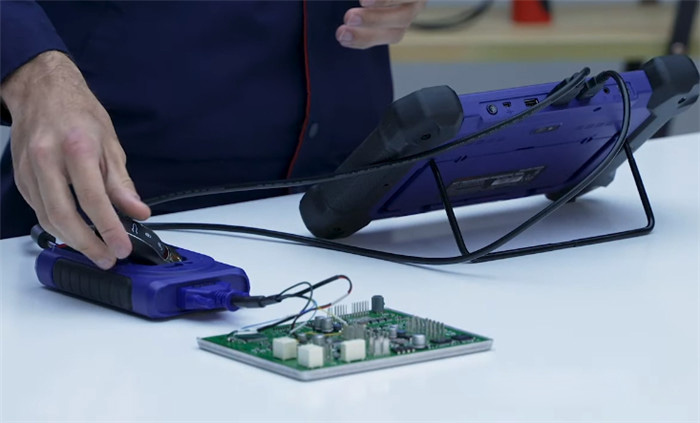
We need to read info from the chipset by connecting it with XP400 Pro key programmer.
Make sure you’re connected to the key programmer and the programmer is connected to the IM608 Pro tablet.

Porsche-EEPROM-Programming-with-Autel-IM608-Pro-1

Next, go to learn key for Porsche.
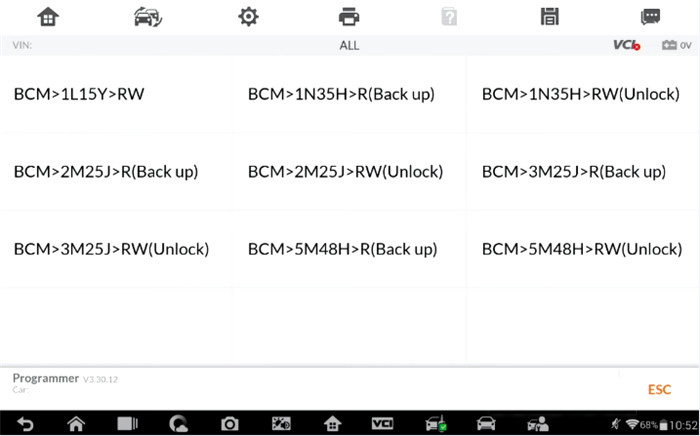
Select Programmer>> Accept the disclaimer>> Chip (EEPROM, MCU, ECU)>> Chip read& write>> Immobilizer>> PORSCHE>> BCM>5M48H>R (Back up)

Porsche-EEPROM-Programming-with-Autel-IM608-Pro-2

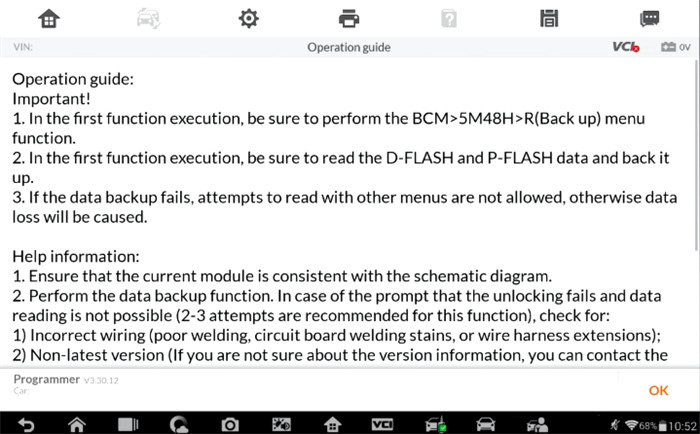
Read the operation guide and helpful information carefully

Porsche-EEPROM-Programming-with-Autel-IM608-Pro-3
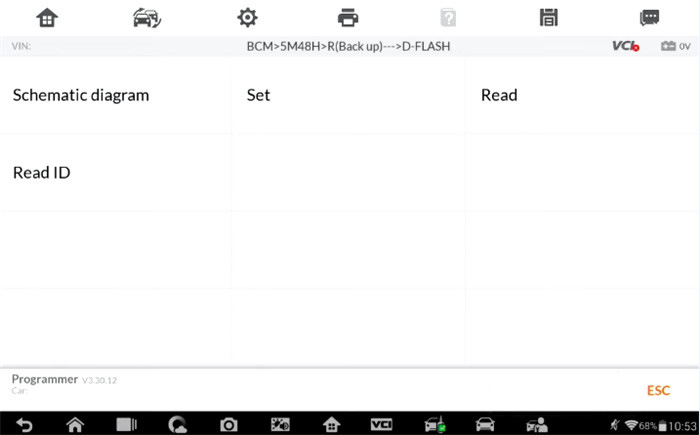
Since we’re reading data, we need to select “D- FLASH”
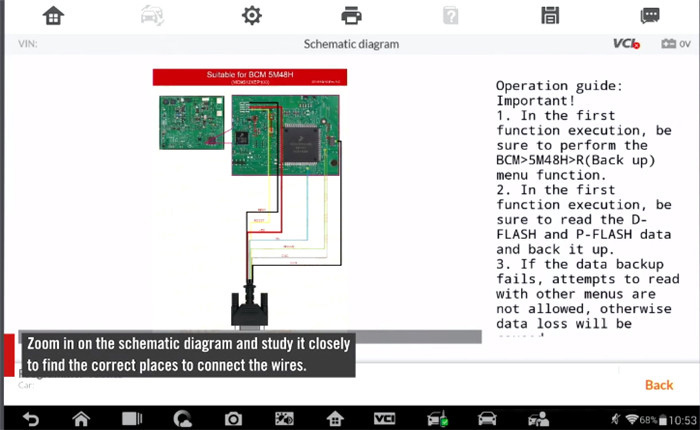
Then we can view the schematic diagram

Porsche-EEPROM-Programming-with-Autel-IM608-Pro-4

Zoom in on the schematic diagram and study it closely to find the correct places to connect the wires.
Then follow the on-screen instructions to do

Porsche-EEPROM-Programming-with-Autel-IM608-Pro-5

You need to cut a line in one spot and remove two other parts, then connect the wires accordingly. They are color coded and labeled to help you out.

Once the wires are connected, go back and select read, this will read the info from the ECU and record it in the tablet. We will use the info to learn a new key.

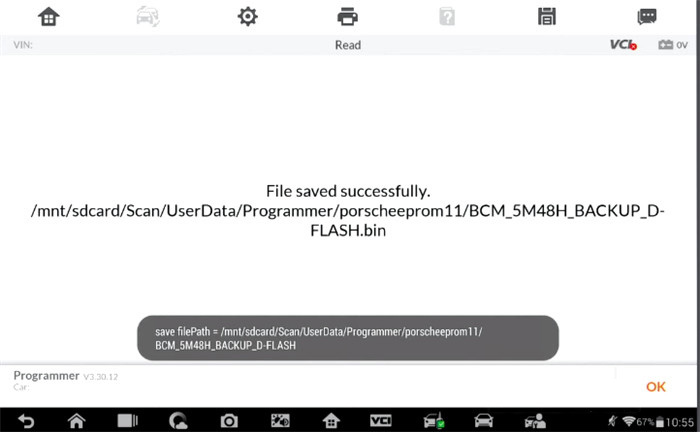
When the data has been read out, save the file into a new folder and call it whatever you want (such as porscheeeprom11).

After that, exit and go back to the home screen and select immobilizer function.
Select Porsche or auto scan the VIN
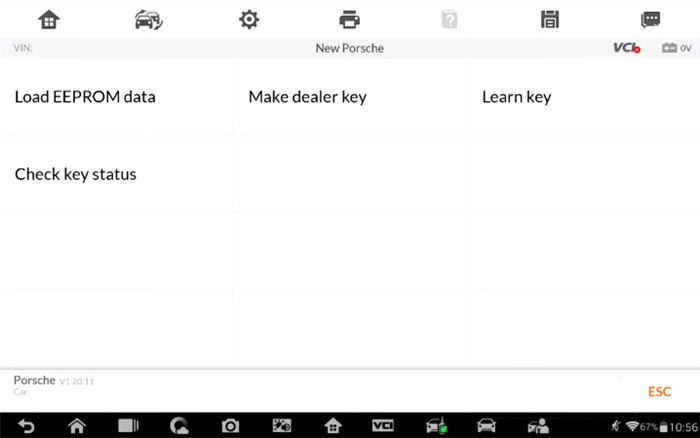
Select Expert Mode>> New Porsche

Porsche-EEPROM-Programming-with-Autel-IM608-Pro-6

1.Load EEPROM data
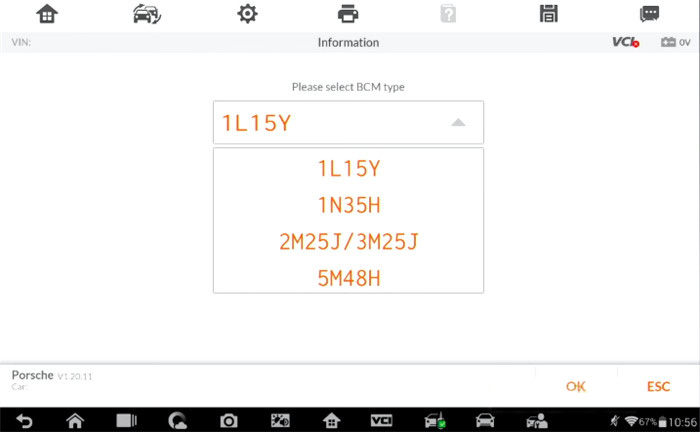
Find the BCM type located on the chipset, then go into the programmer file and find your file porscheeeprom.

Porsche-EEPROM-Programming-with-Autel-IM608-Pro-7

It’s beneficial for you at this point to take a picture of the info. Just in case it doesn’t load in the future.

Porsche-EEPROM-Programming-with-Autel-IM608-Pro-8

2.Make dealer key
Put a blank key into the Autel XP400 Pro key programmer, then select make dealer key

Porsche-EEPROM-Programming-with-Autel-IM608-Pro-10

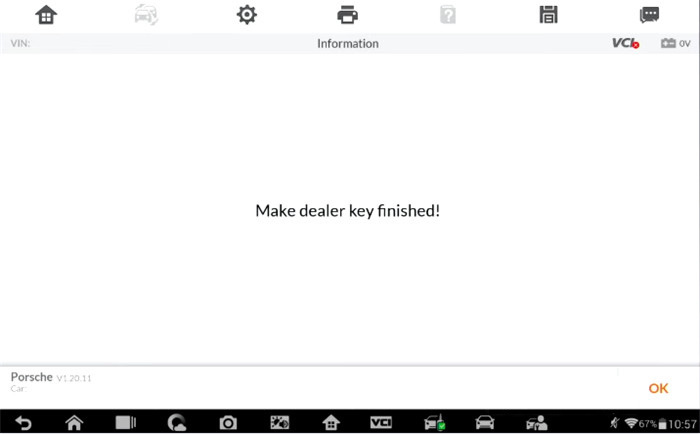
Once make dealer key is successful, move on to key learning process.

Porsche-EEPROM-Programming-with-Autel-IM608-Pro-11

3.Learn key
You need to connect your JVCI into the OBD2 port and learn the key
Make sure a skilled professional is performing the EEPROM process.

Done!

That’s the whole process to program new key to Porsche with Autel IM608 Pro with XP400 Pro.

2021年7月30日星期五

VXDIAG Ford IDS Parameter Programming Data Error


Problem:

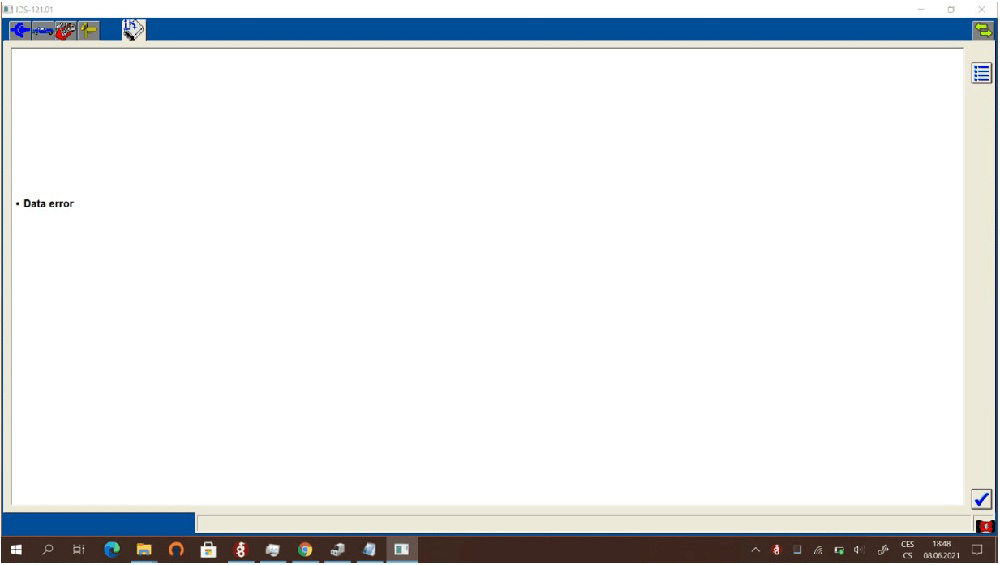
I got a problem when trying to do parameter programming with the vxdiag vcx nano ford IDS V121.01. It gave a data error. It cannot be done?

VXDIAG-Ford-IDS-Parameter-Programming-Data-Error-1
VXDIAG-Ford-IDS-Parameter-Programming-Data-Error-2

Solution:

Parameter programming requires online subscription.

We don’t provide an online account.

Ford Parameter programming example:

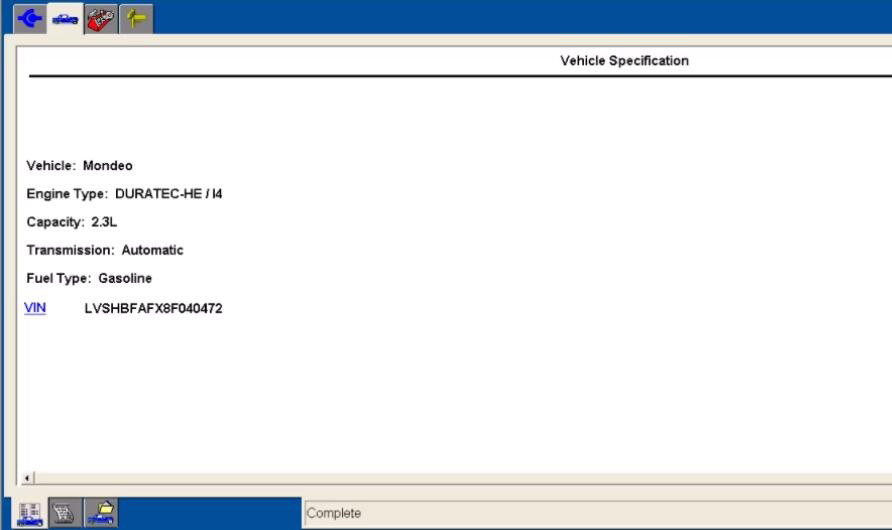
i.e Ford Mondeo 2007

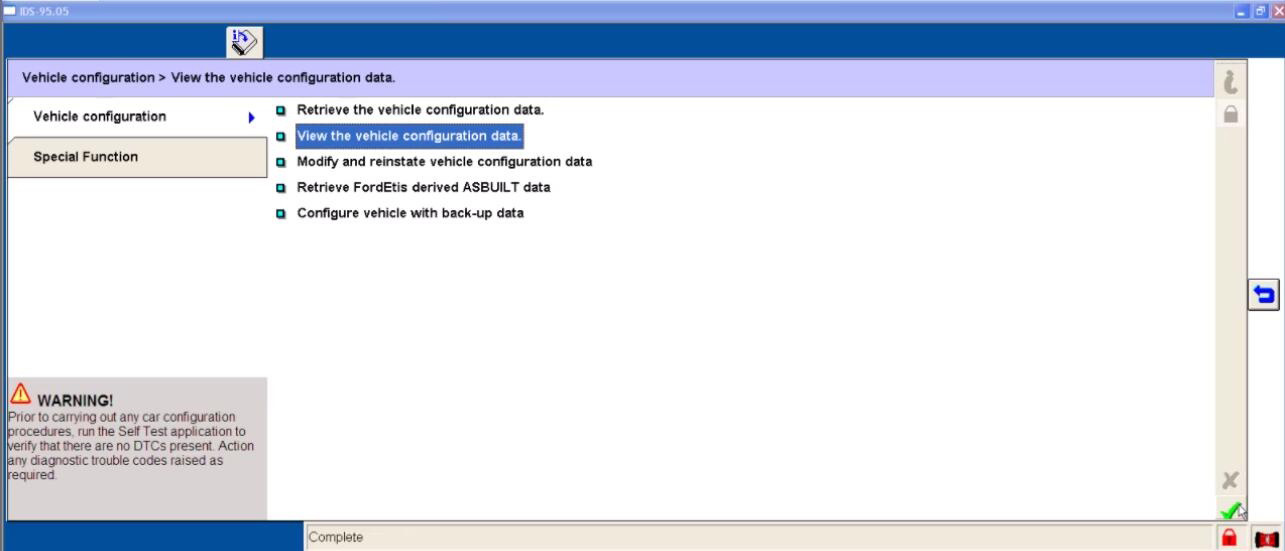
Start New Session-All other-Vehicle Specification

VXDIAG-Ford-IDS-Parameter-Programming-Data-Error-3

It will show the VIN
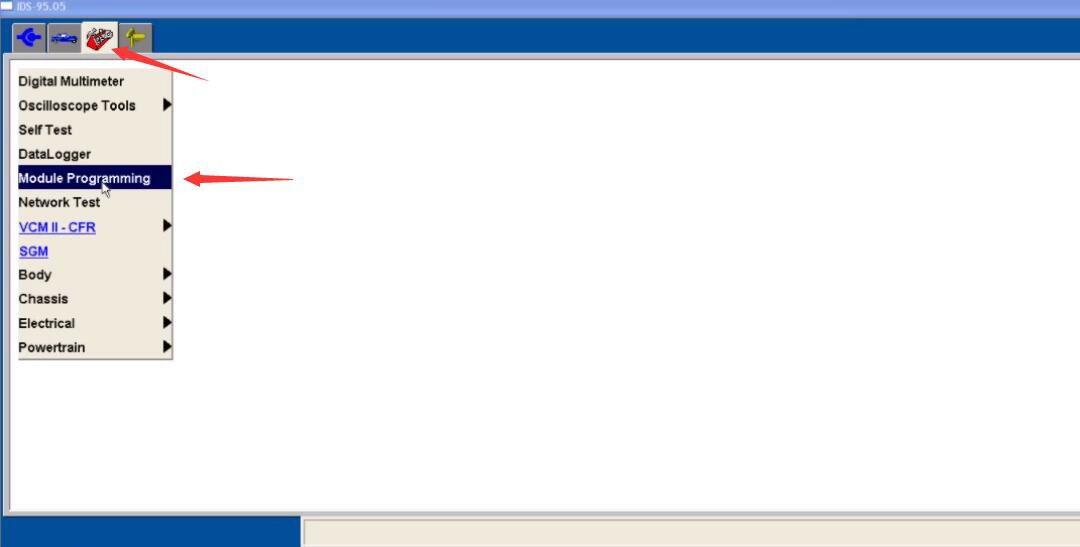
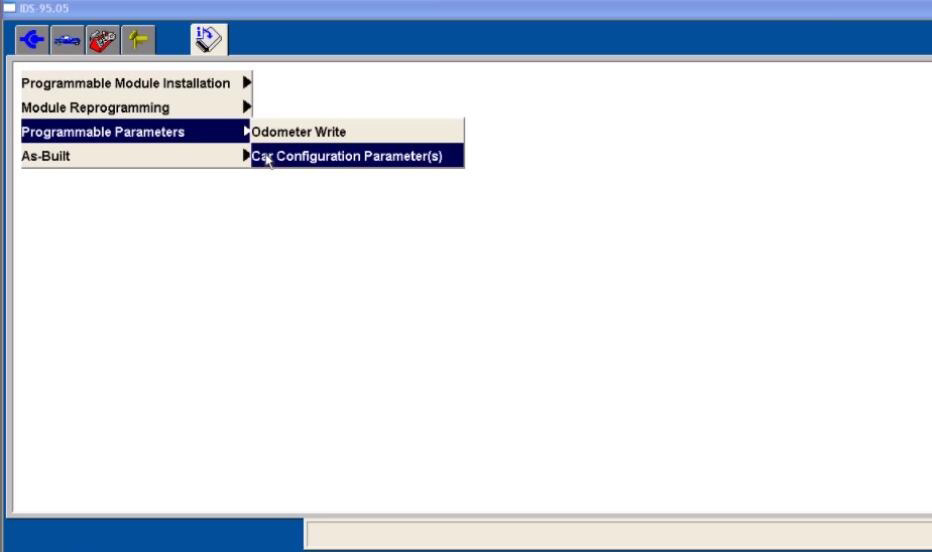
Click menu to select -Module Programming-Programming Parameters- Car Configuration Parameter(s)

VXDIAG-Ford-IDS-Parameter-Programming-Data-Error-4
VXDIAG-Ford-IDS-Parameter-Programming-Data-Error-5

During Module Programming this module goes through a VIN verification process.

This process compares the VIN in this module with the VIN in other modules on the vehihcle. You may see the VIN verification screen more than once depending upon your response to the question.

VXDIAG-Ford-IDS-Parameter-Programming-Data-Error-6

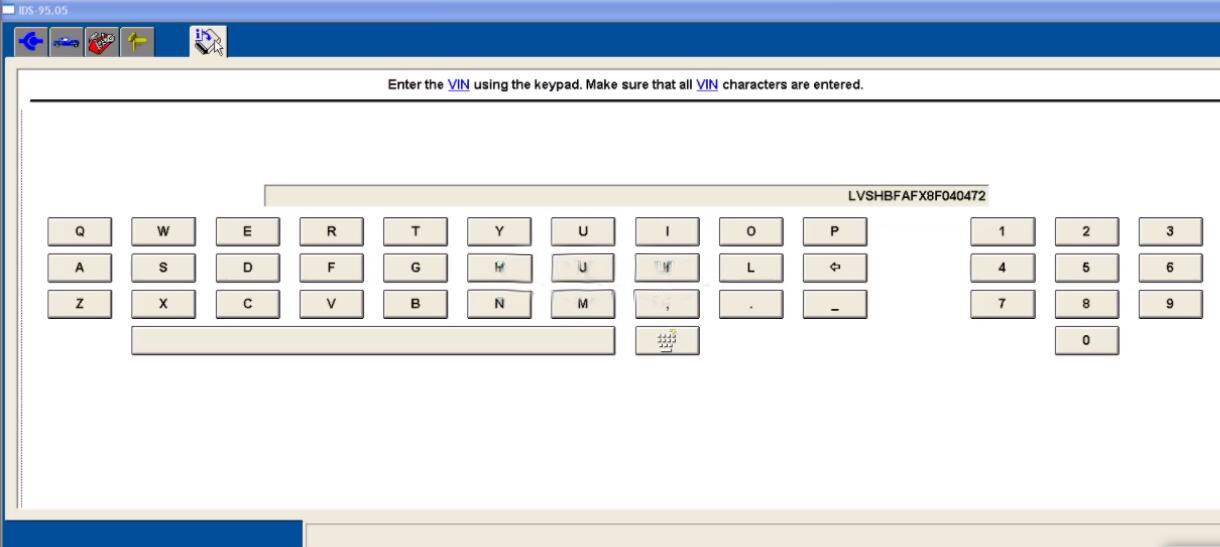
Enter the VIN and confirm

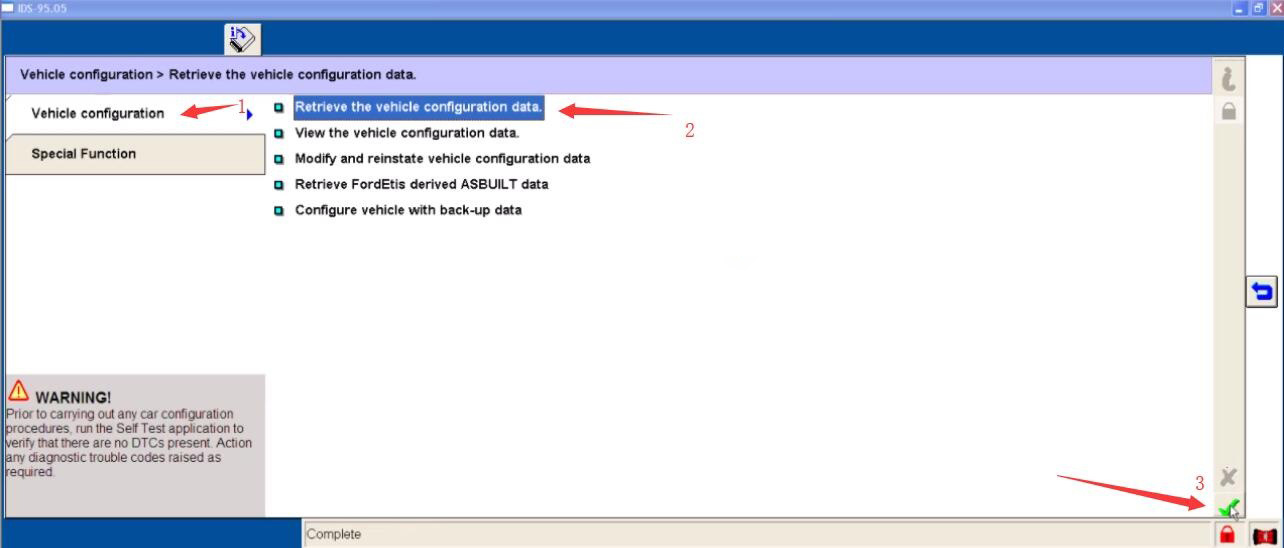
Select “Vehicle configuration”-“Retrieve the vehicle configuration data”

VXDIAG-Ford-IDS-Parameter-Programming-Data-Error-7VXDIAG-Ford-IDS-Parameter-Programming-Data-Error-8

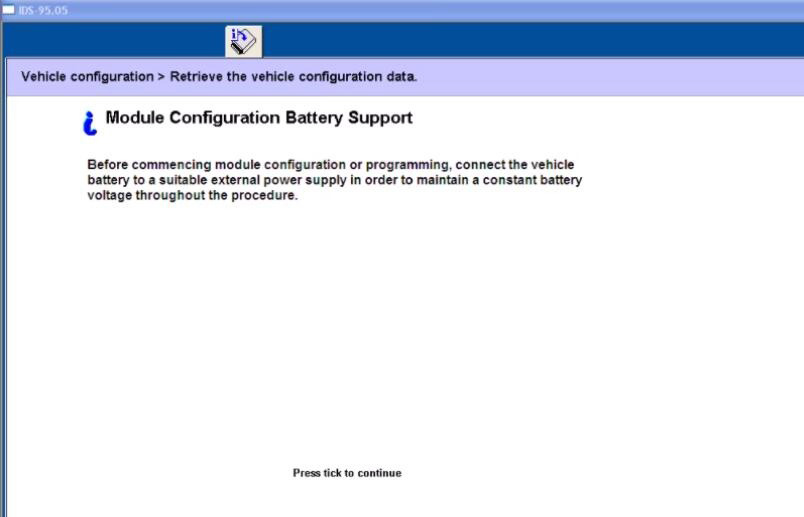
Click tick to continue
It will prompt you with the “Module Configuration Battery Support” information

VXDIAG-Ford-IDS-Parameter-Programming-Data-Error-9

Follow the Ford IDS prompt to set the ignition switch to ON
Operator question

Click tick to continue
Set ignition switch to OFF (Position 0)
Operator Action

Switch the ignition ON
Switch the ignition to off

Press tick to continue

VXDIAG-Ford-IDS-Parameter-Programming-Data-Error-10

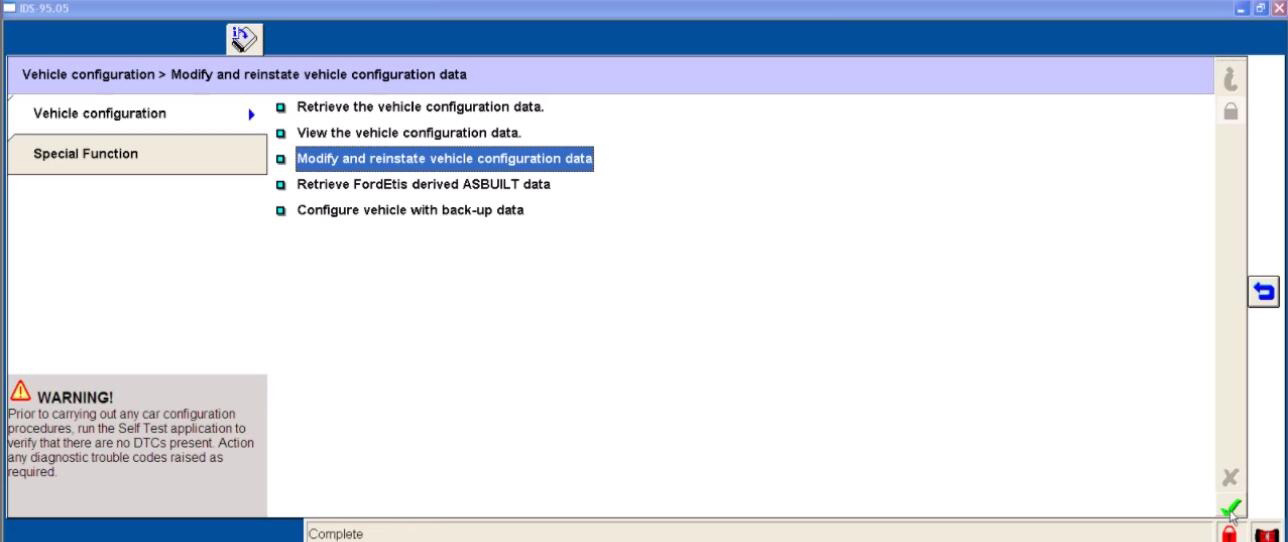
Back to select “Modify and reinstate vehicle configuration data”

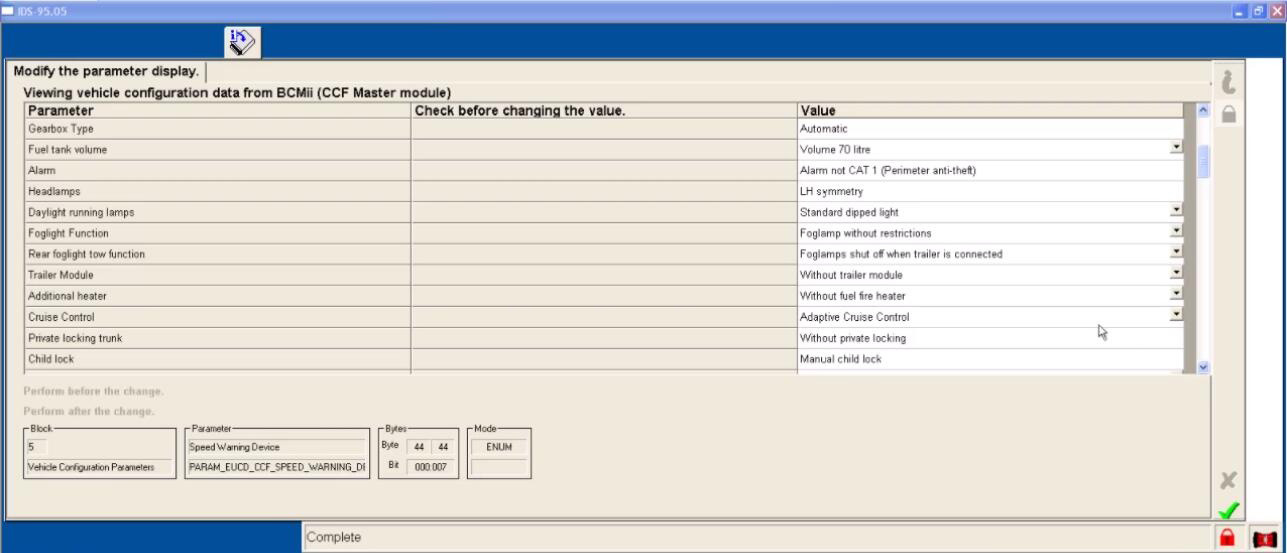
Here you can view vehicle configuration data from BCMii(CCF Master module)

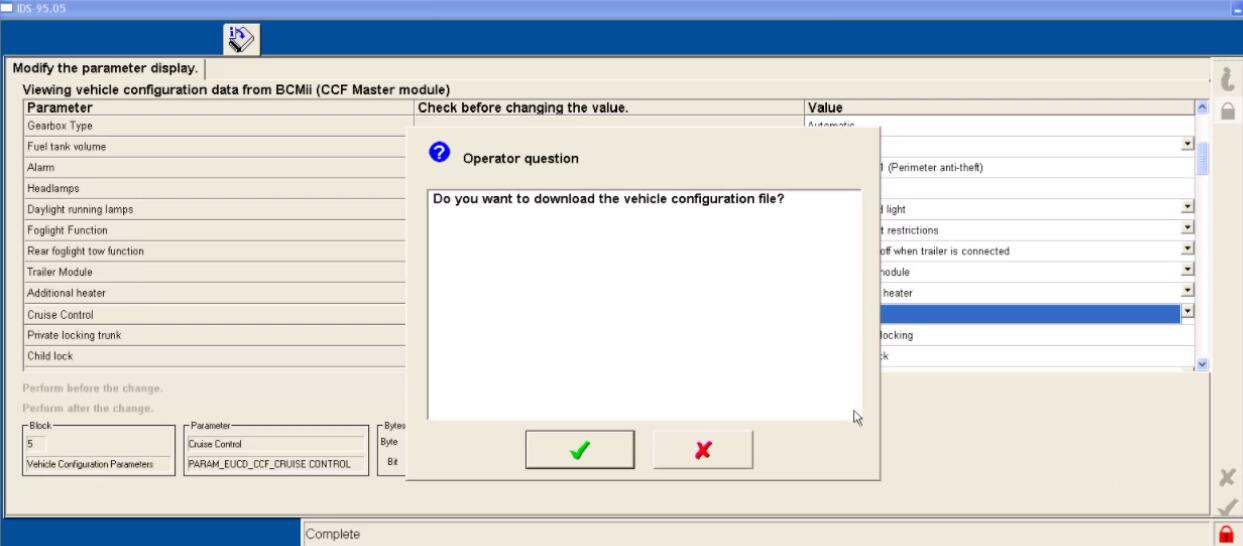
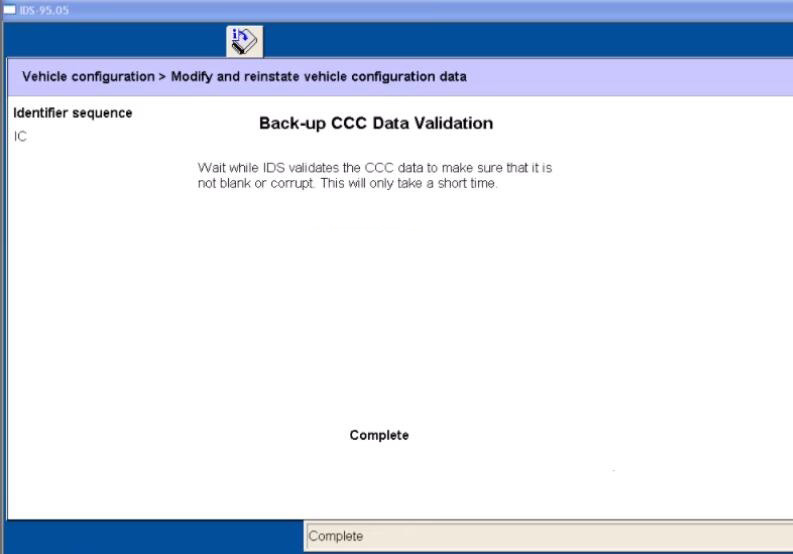
And before you modify the configuration data, you would better to download the data file to make a backup.

Select the system data file you want and then click the tick to download

VXDIAG-Ford-IDS-Parameter-Programming-Data-Error-11
VXDIAG-Ford-IDS-Parameter-Programming-Data-Error-12

Set the ignition switch to ON

Set ignition switch to OFF(Position 0)

Switch the ignition ON

VXDIAG-Ford-IDS-Parameter-Programming-Data-Error-13

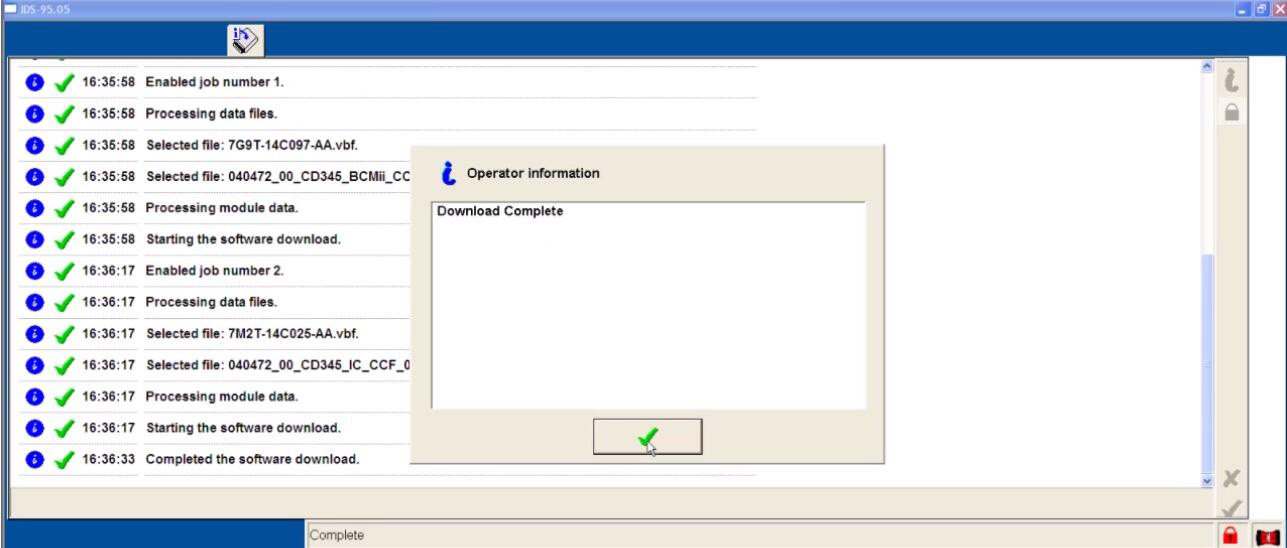
Download complete

Switch the ignition Off

You can view the vehicle configuration data here

VXDIAG-Ford-IDS-Parameter-Programming-Data-Error-14

Done!

BMW Coding Support and Solutions


BMW coding for your BMW 1, 2, 3, 4, 5, 6, 7, X, I, (2004-current E, F, and G, I chassis), and BMW Mini (R5x & F5x) Vehicles using BMW factory software such as INPA, NCS Expert, and BMW Diagnostic Software E-Sys. The features below represent a majority of the conveniences that can be disabled/enabled on your BMW (if applicable to your chassis).

Lights

Amber/Corner lights delete
Angel eyes as DRL
Disable bulb out warnings (disables warm and cold testing of bulbs)
Double flash hazards (not applicable on F-series chassis)
Pathway lighting with the key fob (follow me home lights)
Fog and high beams on at the same time
LCI taillight retrofit coding
Aftermarket HID coding
Disable DRL high beams
Disable DRL taillights
Front turn signals on when welcome lights activated
Angel eyes on when welcome lights activated

Cluster

M style digital speedometer
True car speed on the digital speedometer
Lock doors once a certain speed is reached/Unlock doors when the key is ejected
Turn off the car and eject the key fob by holding the ignition button in when parked
Nighttime illumination in a cluster with Daytime Running Lights
Turn signals in HUD
Disable Auto Start/Stop by default (F and G series only)
Remember the last setting of Auto Start/Stop (F and G series only)
Entertainment options in HUD (F series only)
Recent call list in HUD (F series only)
Assisted Driving View (G series only)

iDrive

Traffic options added to CCC/CIC navigation to alert you to any traffic congestion and offer detour options **More info**
Aux audio input enable
Enable Mp3 playback (Is your BMW compatible?)
Bluetooth retrofit coding
Satellite Radio input enable (needs hardware module to function)
CD changer input enable (needs hardware module to function)
Remove Legal disclaimer in Idrive
Remove weather band from entertainment source selection
Skip AM band on entertainment source selection
CIC retrofit coding
CIC DVD-in-Motion (For vehicles with CIC units only) *additional fee*
Update CCC DVD navigation maps ($15 installation fee). **Do I have CCC or CIC?**
Climate shortcut display shows in iDrive when fan button pushed (e9x only)
Seat heater “hi-med-low” slider in iDrive (e6x only)
Navigation FSC update code for latest Maps *additional fee*
Radio/Navigation off when the door opened (F series only)
Automatically set time by GPS in iDrive (NBT iDrive only)
Enhanced Bluetooth and USB (F series only)
Side view cameras on at all speeds (F series only)
Top view cameras on at all speeds (F series only)
Backup view camera on at all speeds (F series only)
Remove PDC + Cam disclaimer (F series only)
Tire pressure + Temperature in TPMS (F series only)
Phone Ringtone sent to CIC (F series only – not applicable on cars with no navigation)
DRL front and rear options (G series only)

Climate

AC blower was not turned on automatically when ignition switched on
LED fan speed indicator on in the Auto mode
Pressing “AUTO” on climate control does not turn on AC

Body

Windows up/down sunroof open/close with a key fob button press
Mirror fold in with key fob (must-have mirror fold option)
Disable seat belt butlers
Disable seat belt chime
Alarm module retrofit coding
Change alarm siren type to Euro (E-series chassis only)
Disable auto-dimming mirror (side-views)
Disable window safety feature (opening doors will not interrupt roll-up operation – not applicable to E6x)
Disable door chime when the door is open and the key is in slot
Enable acoustic notification on lock/unlock (must have alarm module)
Convertible roof-top open while driving (E-series convertibles)
Convertible roof-top open with the key fob (E93, and F-series convertibles)
One-touch auto open/close sunroof
Easy Entry – seat moves back a little when you open the door (F series only)
Enable Blind Spot Detection at lower speeds  (F series only)
Reprogram 3rd and 4th buttons on key fob (I3 Only)
Trunk close with key fob and interior button (F, X3, X5 series only. Not including 6 series F models)

Engine
Diagnostics and Service

Clear engine and transmission adaptations
Reset FRM short circuit counters/locks
Write VIN# and program used replacement ECUs/modules
Disable Neutral Idle Control per bulletin SI B24 03 08
New battery registration
Read/Clear OBD and BMW specific diagnostic codes
BMW Diagnostics and calibration using ISTA/Rheingold/INPA/Tool32
Replacement fuel injector parameter coding (N54/N55 engines)
Adjust idle RPM’s (not available for R5x BMW Mini models)

I3

Allow 2.4 Gallon Tank Capacity (I3 only)
Allow REX anytime below 75% “Hold Mode” (I3 only)
Eco-Pro or Eco-Pro+ on startup (I3 only)
Traffic Jam Assistant (I3 only)

BMW Performance Power Kit PPK (for N54 & N55 engines)

For N54 equipped vehicles produced from 03/2008 till 03/2010
For N55 equipped vehicles produced up till 02/2012
Increased torque of 317 ft-lbs (manual trans) or 332 ft-lbs (auto trans), available from just 1,500 rpm
Increased maximum output* of 320 horsepower (see graph image)
Faster acceleration from 0 to 75 mph

**Please include the last 7 digits of your VIN# in the quote.
Alpina B3 Transmission Flash (for N54 & N55 engines)

For N54/N55 equipped E9x vehicles produced from 03/2007+
Smoother shifting
Quicker up-shifts in D mode (Better fuel economy)
More precise shifting with fantastic rev-matching on downshifts in Sport mode.

**Please include the last 7 digits of your VIN# in the quote.
E90/E92/E93 M3 Euro GTS DCT flash

Improves the jerky or clunky downshifting when coming to a stop
Quicker and smoother gear shift engagement
Reduced clutch slip at higher RPMs
No more lag when shifting into reverse
Toggling the shifter switches to D2 instead of S3 with S mode memory

**Please include the last 7 digits of your VIN# in the quote.
N52 Three Stage Intake Manifold Flashing (for N52B30 engines)

For N52B30 equipped 1, 3, 5, and Z4 series E chassis vehicles
Up to 255bhp with 221 lb-ft of torque @ 6600rpm (265bhp for the 130i)
BMW 130i, 330i, 530i, Z4si factory software reliability

**HP gains to wheels will be more conservative.

**Please include the last 7 digits of your VIN# in the quote.
E46 M3 w/SMG II

CSL rev-matching and motor inertia DME parameters
CSL Transmission Software Flash
Cold-Start Delete
EWS Delete
Sport button memory
Speed governor removal
Enable shift lights with Manual Transmission

**If the vehicle has aftermarket tune or ECU upgrade please inquire if possible.